Install WordPress Plugin – Quick Guide for Beginners
Introduction
Once you have successfully installed WordPress, you will surely need more features. Maybe you want to use a contact form? Or set up a backup? You can easily implement all this with the help of plugins.
Because in the official plug-in directory of WordPress, you will find a suitable extension for almost every function. There are currently over 55,000 plugins listed – and new ones are added every day.
The popular CMS WordPress is based on the building block principle. With plugins, WordPress can be adapted to the respective user requirements.
We explain to you what WordPress plugins are and introduce you to three ways to install a plugin in WordPress.
What is WordPress Plugin?
A plugin is a PHP script that, after activation, extends the WordPress installation with a specific functionality. There is a plugin for almost every function – from simple linking to social media profiles to complex shop systems. The extensions are often available free of charge.
How do I Install WordPress plugin – Automatically vs. Manually?
There are three ways to install a plugin in WordPress:
Automatic installation of WordPress plugins
To do this, log into your WordPress backend. Click Plugins in the left menu bar. Under Installed Plugins, you will see all previously installed plugins, regardless of whether they are activated or deactivated.
To add a new plugin, click Install. In the “Browse Plugins” search bar, enter a keyword or the name of the plugin. You can search directly for Google Analytics.
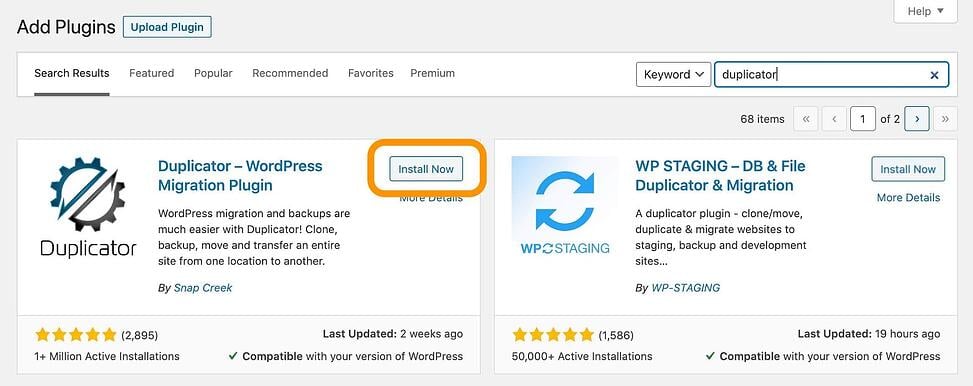
In both cases, you would see our example plugin. Now click on Install now – the process will now start automatically.
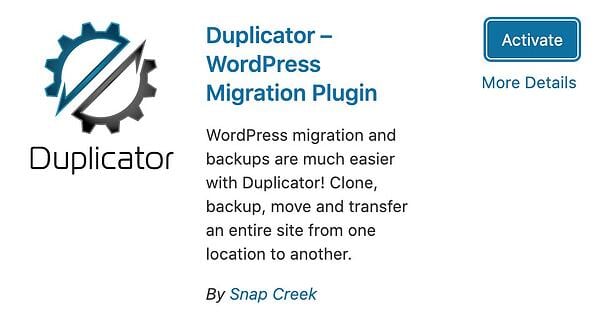
The plugin can then be activated – it then appears in the left menu bar.
Now, let’s do step by steps to Install free WordPress plugin
The easiest way to install WordPress plugin is via the WordPress dashboard. Especially for beginners.
If you are still not finding your way around the WordPress backend, we hope our simple 4-step instructions will help you.
- After logging in to the dashboard, click > Plugins > Install in the menu on the left
- You can then search for plugins in the search field.
- In the list of results you now select the plugin and click on “Install now”.
- Once the plugin is installed, all you have to do is activate it with a click.
If you want to deactivate or delete it again, you can find it in the menu under > Plugins > Installed Plugins.
Manual WordPress Plugin Installation – upload a zip file
Some plugins are not offered directly in the WordPress installer. On WordPress.org you will find a huge plugin library. You can also search by name or keywords here. Click on the desired plugin and select Download.
Save the zip file in a place you can easily find. Switch to your WordPress backend and open the Install Plugins menu item.
Now click on the Upload Plugin button.

Select the file and click Install Now.
After uploading, a new page will open where you can now activate the plugin.
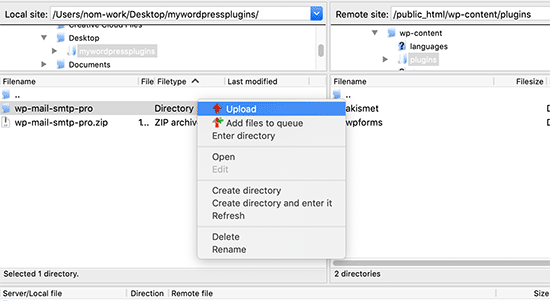
Manual installation of WordPress plugins – via FTP
For example, if you have developed your own plugin or get your plugins from other sources, you have to upload them to your server manually via FTP.
To do this, connect to your web space using an FTP client (e.g. Filezilla) and upload the fully unzipped plugin folder to the wp-content/plugins folder.
Then switch to your WordPress backend and update the view of the installed plugins. If the upload was successful, the plugin will be visible there and can be activated.
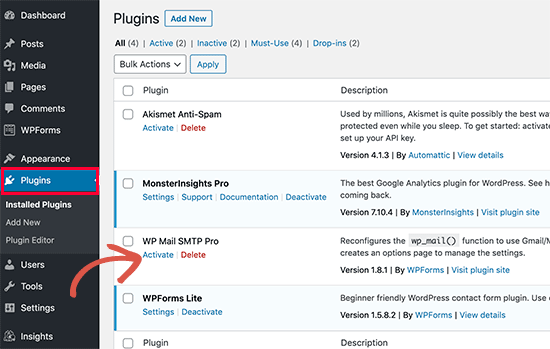
After activation, you usually have several setting options available. You should also directly check the functionality of your website.